Monday, November 16, 2009

How to copy playlist from iPod/iPhone to Mac

Related Article:

1.How to transfer iPod songs and videos to Mac with Senuti

2.Free applications for copying music, videos from an iPod to your computer(Mac, Windows, Linux)


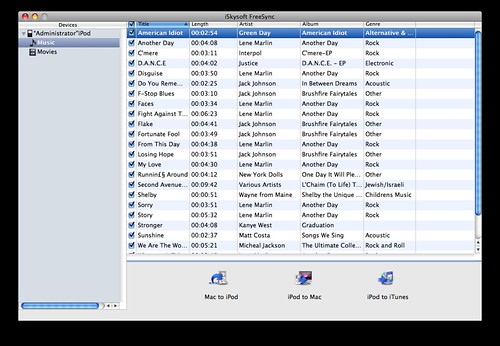
do you want copy iPod playlsit to mac or copy iPhone playlist to mac,as we know Senuti is a useful Mac application for transferring songs, playlists, or videos from your iPod back to your computer. In the event that you lost your iTunes library or you got a new Mac and want to transport songs to it with your iPod. Below is the step by step tutorial about how to use Senuti transfer iPod to Mac

Note: Senuti used to be freeware but it is no longer free and now cost $18. If you are looking for a free app that does the same thing, check out FreeSync.

1. Download Senuti and install it. Drag the Seunti application to your Applications Folder. Drag Senuti into your dock or save a copy on your desktop if you wish. Eject the Senuti disk image and clear your download folder.

2. Make sure you have iTunes.

3. Plug your iPod into your computer. In the iPod settings window in iTunes, set your iPod to "Manually manage music and videos" in iTunes.

4. Open Senuti. Drag and drop playlists from your iPod into "iTunes".

SyncPod is a Mac application that not only transfers iPod songs, videos and movies like Senuti. The current version of SyncPod do not support drag and drop playlist to iTunes so you need to select the playlist and transfer it to iTunes in “iPod to iTunes”. However, SyncPod offers some useful features and functions. See below:

1. SyncPod has separate playlist for music and movies, while Senuti have music and movies in the same category: Library, making it a little bit troublesome to find the movies or songs you would like to transfer to Mac or iTunes.

2. SyncPod allows you to add, delete, and edit your playlist conveniently.

3. When you connect two iPods or both iPod and iPhone simultaneously to Mac, SyncPod will organize two iPods at the same time, making the process of sharing music and videos between iPods as easy as a few clicks.

4. SyncPod also supports photo transferring, while Senuti only supports songs and videos.

more tags:
transfer iPod to Mac with Senutirecover iPod videos to iTunes SenutiSenuti transfer ipod songs to MacSenuti recover videos to iTunes mactransfer ipod movies to mac with Senuticopy iPhone playlist to Mac OS Xcopy iPod playlsit to mac Snow Leopardcopy playlist from iPod to iTunescopy playlist from iPhone to iTunes

Monday, September 28, 2009

How to Transfer Songs and Videos from iPod (nano,touch,classic,shuffle included) to Mac for Free

iPod touch as example

When you accidently delete music or videos in your iTunes Library, or you lost all songs and movies files when your hard drive on your Mac die, you might try to recover the data from your iPod by connecting it to iTunes, only to find that’s no way to get the files back to your Mac. Or you just got a new Mac and you want to transfer you iPod touch content to it. In cases like these, FreeSync is a totally free program that can help you transfer your songs and videos to Mac. And below is the step by step tutorial about how to transfer songs and movies from iPod touch to Mac.

Note: The upcoming version of FreeSync will support iPhone 3GS, iPhone updated to OS 3.1, iPod touch updated to OS 3.1, and new iPods released on Apple “Rock and Roll” media event.

Step 1: Launch iSkysoft FreeSync and then connect iPod touch to Mac.

Step 2: Click “Music” or “Movies” playlist and then tick the file you want to export.


Step 3: Click “iPod To Mac” to start transferring your music or movies file to your Mac

Step 4: Select a destination folder to save your iPod touch music and videos and click “OK”

Note: If you want to import music or movies to iTunes, you can either drag the output folder of you iPod touch content to the “Library” icon and let iTunes to classify your music and movies, or go to “File” pane and select “Add to Library” to navigate to output iPod touch content and add it to iTunes.

FreeSync is a good helper for you to transfer iPod songs and movies to your Mac. If you have both iPod and iPhone, this smart program also allows you to transfer all contents to Mac at a time by connecting your iPod and iPhone with Mac simultaneously.

more tags:
transfer iPod shuffle songs to Mac,free iPod shuffle app,put iPod songs to itunes Mac,backup iPod music to Mac itunes,free iPod managers,songs from ipod to mac
transfer iPod classic songs to Mac,transfer iPod movies to Mac free,free iPod classic app,put iPod songs to Mac itunes,movies from ipod classic to mac,transfer iPod nano songs to Mac,transfer iPod nano movies to Mac,free iPod nano app,iPod videos to itunes mac,movies from ipod to mac,downloud iPod movies to mac itunes
transfer iPod touch music to Mac,transfer iPod touch movies to Mac,free iPod touch app,get ipod videos to mac,transfer ipod to itunes mac,download music from iPhone to itunes

How to Convert and Put Videos to iPod (nano,classic,shuffle,touch included) on Mac

ipod nano as example


You might have some interesting video movies or game videos on your Mac, like funny videos or TV shows downloaded from YouTube, videos sent to you by friends. You can easily add your videos to iTunes and then sync to your iPod nano if they are compatible with iPod. However, for those videos not compatible with iPod like FLV, WMV, AVI videos etc, that won’t be a straightforward process.
In order to put them on your iPod nano( New iPod nano included), you need to convert them to iPod nano compatible format first. A professional yet easy-to-use iPod nano Movie Converter for Mac is designed to solve this problem with 3 simple steps! With intact output quality and with high conversion speed, you can enjoy your favorite videos on your new iPod nano anytime, anyplace!

How to Convert and Put Video movies to iPod nano (New iPod nano included) on Mac


1. Click “Add File” or just drag and drop the video(s) you want to convert to the program.


2. Select “iPod Nano MPEG-4” from the output format dropdown list.


Note: If you just want to extract audio from video, you can select an audio format like MP3 from the format list.

3. Hit “Convert” and let this iPod nano Movie Converter for Mac to do the test for you!

4. When the conversion is done, open iTunes and drag & drop the movie to iTunes Library and then it is ready for being synched to your iPod nano!

If you don’t want to wait around during the conversion, this smart Pod nano Movie Converter for Mac can automatically switch off your computer when the conversion is done. Plus, it supports the latest released New iPod Nano 5th Gen. With this iPod Movie converter, you can now enjoy movies and TV shows on your iPod Nano during a long trip, or while lying lazily in a cozy sofa!

more tags:
Put movies on iPod nano ,put videos on ipod nano ,put films on ipod nan ,mac video to New iPod nano ,convert mac video to iPod ,mac video to ipod nano ,put music videos on ipod nano free
put videos on ipod touch , put movies on iPod touch , new iPod touch video tutorial , convert videos to iPod , play mac video on ipod touch , wmv ipod touch osx

How to put DVDs to iPod ( touch,nano,shuffle,classic included) via iTunes on Mac

iPod touch as example

iPod touch lets you enjoy everything you love about an iPod, and then some. Watch your movies and TV shows on a brilliant 3.5-inch display. The new iPod Touch stores up to 80 hours of video and get up to 6 hours of video playback time on the new iPod touch. So if you want to put some of your favorite DVD movies on it for playback on the go, how to do that? Just follow the simple steps below.
iTunes won’t allow you to sync your commercial DVD movies directly to your iPod Touch. So you need a third party app to convert your DVD movies to iPod Touch compatible format like MP4 first. A professional yet easy-to-use DVD to iPod Touch Converter for Mac helps you convert your DVDs with intact output quality conveniently and with high conversion speed

How to put DVDs to iPod touch on Mac OS X (Snow Leopard included)

Step 1, Install DVD to iPod touch Converter for Mac and click “Load DVD” to add the DVD you want to convert. Select the VIDEO_TS folder and click OK.


Note: This smart DVD to iPod touch converter allows you to only convert certain title or chapter of the movie. You can also trim the DVD movie to get your favorite segment of the movie and put it on your new iPod touch for playback again and again.

Step 2,Select “iPod touch MPEG-4” from the dropdown output format list.


Note: If you just want to extract DVD audio, you can select an audio format like MP3 from the format list.

Step 3,Hit “Convert” and let this DVD to iPod Converter for Mac to do the rest for you!

When the conversion is done, open iTunes and drag & drop the movie to iTunes Library and then it is ready for being synched to your iPod touch!

If you don’t want to wait around during the conversion, this smart DVD to iPod Converter for Mac can automatically switch off your computer when the conversion is done. Plus, it supports the latest released New iPod Touch. With this DVD to iPod converter, you can now enjoy movies on your iPod touch during a long trip, or while lying lazily in a cozy sofa!

Wednesday, August 19, 2009

MacTheRipper Using Using


Nowdays DVD is important and popular ,people like to play it ,and most people also want to copy the contents of the video DVD to their computer or other Portable devices for playing,but the DVD contents is Protected,so we are not allowed to do it directly,MacTheRipper is a good choice for the MAC user to sovle this trouble, at present,it is very popular ,more and more people become to use it .

MacTheRipper is a Mac OS X application that enables users to create a playable copy of the contents of a Video DVD by defeating the Content Scramble System. During this process it may optionally modify or disable the DVD region code or the User operation prohibition features of the copied data. The previous lack of an OS X equivalent to the PC software DVDShrink gave this standalone DVD ripper widespread popularity among Macintosh users.

I think the interface of it is simple to understand and it is convenient and practicably for us to use after I used it ,so I'm very glad to Share Some Tutorials About Using It.


1.How to Use MacTheRipper to Extract Audio from DVD


MacTheRipper not only allows you to rip DVDs but also extract DVD audio and save it in AC3 format. However, AC3 is not compatible with Mac so you can’t play back the audio with QuickTime.


This tutorial is divided into two parts: extract DVD audio with MacTheRipper, convert AC3 to MP3, AIFF or WAV.


2.How to Play the Ripped Movies from MacTheRipper


When you finish the ripping, you’ll find a VIDEO_TS folder in the destination folder you choose to save the movie on the hard drive containing the ripped parts of the DVD. This folder can be opened in the Apple DVD player or in VLC.


In this artic we take Apple DVD Player as an example and below are the easy steps about how to play ripped movies from MacTheRipper.


4.How to Import File Ripped by MacTheRipper to iMovie, Final Cut, or QT


MacTheRipper is an application for Mac users to backup their DVDs on Mac. The output video files are in .VOB format and you can play back the movie with VLC or Apple DVD Player. If you want to edit the output files with iMovie or other video editing tools to create your own masterpiece, you need to convert them first...


This artic is the step by step tutorial about how to convert ripped file to iMovie compatible format.